
v1.42
User Manual
Introduction to Geminus
Geminus aims to extend the graphics capabilities of your RISC OS computer by allowing the use of additional screens, rotatable LCD panels and, later, DVI outputs. It can also accelerate rendering and screen redraws making the desktop feel much slicker. These features can be purchased individually, as desired.
The features currently offered by Geminus are as follows:
- Faster JPEG decoding and rendering
- Transformed plotting of JPEG images
- Smoothed scaling of sprites; anti-aliasing reduces artefacts
The following features are currently available only in the IYONIX pc version:
- Multi-monitor support and portrait modes
- Red/Blue colour swapping for PC hardware
Additional features will be released over time, demos will be available and users may purchase only those features which they desire.
Geminus offers support for a number of different RISC OS machines but not all features are available on every machine. For additional information relating to your specific machine, see below:
-
Overview of Geminus
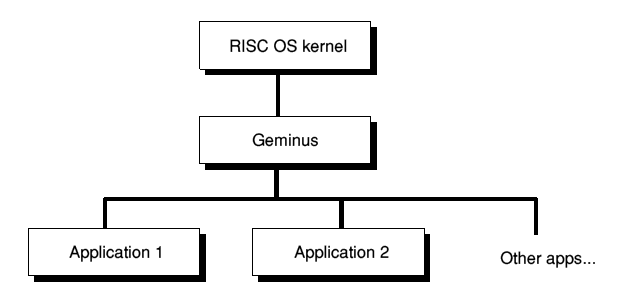
Geminus provides a software layer that sits between the RISC OS 5 kernel and the graphics card driver(s), allowing it to extend and optimise many operations.

It also intercepts requests that applications ask RISC OS to perform. This allows Geminus to accelerate various graphics operations and to improve image quality or provide additional functionality. For any application that behaves in a way that Geminus does not anticipate, the affected feature(s) of Geminus can be disabled just for that application.
Installing Geminus
When you have downloaded Geminus you will have a zip file that contains an application called !GemConfig. This application can be run in the normal manner by double-clicking on its icon but it is also designed to be installed as a Configure plug-in by dragging it into the directory
!Boot.Resources.Configure
. If you do this a Geminus icon should appear in the Configuration window (viewed by double-clicking on !Boot) allowing you to configure Geminus in the same way that you configure other aspects of your computer.If you wish Geminus to start up automatically when you switch on your machine, you should copy the Geminus module from inside !GemConfig to the PreDesk directory
!Boot.Choices.Boot.PreDesk.Geminus
Note the inclusion of an exclamation mark so that it precedes the 'Configure' directory thus ensuring that Geminus is loaded before the machine tries to enter a Geminus screen mode, should you later configure it do that.Licence Management
Geminus is supplied using Sendiri licence management. For more details on the licence terms and how the licence management operates, click here.
When Geminus or other Sendiri software is downloaded from Sendiri Store, the archive includes a Licences file which may be dragged into the Licences window that opens when Geminus is first started. Please be aware that the store maintains a record of all your licences so you need only be concerned with the Licences file that you downloaded most recently.
Once the Licences file has been installed, Demo-licensed copies of Geminus will run with full functionality until the time-limited Demo licence expires, at which point the Licences window will reappear whenever Geminus is loaded. When a Full licence has been purchased, the Licences window will not be shown again but it may always be accessed via the iconbar menu or the 'Info' window in the Geminus user interface.
Configuring Geminus
To configure Geminus, open the Configuration window by double-clicking on !Boot and then Geminus (Or just double-click on the !GemConfig application instead). The window that opens has five panes -
Info
The first pane ('Info') just shows a few details about the version of Geminus that you're running and the features that you have purchased. You can also learn more about other features that are available or under development, and visit the website to purchase them or learn more about their progress.

Also within this pane are tick boxes that can be used to enable or disable specific features globally. This may be useful if there are compatibility issues at specific times, although preferably you should use the Settings pane to disable features for specific applications. The main use of these tick boxes is to explore the effect of individual features if you have only a Demo licence of them.
The 'Modes' pane is used to define your screen modes, but first you must tell Geminus the type(s) of the monitor(s) you are using, so that it can use the correct Monitor Definition File(s) (hereafter referred to as MDFs). An MDF describes the capabilities of the monitor and it's important that you use the correct file for your monitor, where one is available.
Monitor types (Multi-monitor feature)
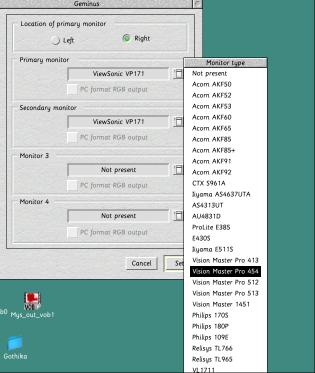
First, you should tell Geminus the location of your 'primary' monitor. This is the one that RISC OS appears on when you first switch on your machine, before Geminus is running. You may have this screen positioned on either the left or the right, and then choose the appropriate option in the 'Monitors' pane so that Geminus can create suitable mode definitions.
You then need to tell Geminus the type of each screen that you are using, by choosing a monitor type or MDF from the menu that opens to the right of each section:
Red/Blue colour swapping
If you have purchased the Red/Blue colour swapping feature (or 'PC RGB format') then you also need to tell Geminus the RGB order of each graphics card/monitor. For the standard NVIDIA graphics card shipped with the IYONIX pc, you should leave the 'PC format RGB output' option unticked. For unmodified cards that you source yourself this option should be ticked because the card expects the Red and Blue components to be in standard PC order, not the order used within RISC OS.
If you have not purchased this feature, the 'PC format RGB output' tickboxes will be shaded and have no effect.
We strongly recommend that people using the red/blue colour swapping feature also purchase the acceleration feature because this makes a significant difference to the speed of the desktop. There is an unavoidable performance overhead in swapping the colour components in all direct screen accesses made by the OS and applications. Geminus, however, is aware of the existence of PC format screens and is therefore able to access them directly and with much greater efficiency, eg. when plotting sprites it will simply use a modified palette rather than modify the value of each pixel that is plotted.
Certain applications, notably video players, will exhibit much lower performance on colour-swapped screens until they have been modified to accomodate them via the Geminus API. Cino, the DVD player application, is aware of Red/Blue swapped screens and can thus modify its own output appropriately, giving equal performance on either screen type. In fact, since the NVIDIA cards are designed for use with PC RGB order, the reproduction of colours is better on screens that employ Geminus's colour swapping capability.
Modes (Multi-monitor and portrait modes)
Now that it knows the monitor type(s) being used, it can suggest some suitable mode definitions, so click on 'Modes' to open the modes pane which will be empty when you first use Geminus. You will see a button labelled 'Suggest modes' which, when clicked, displays a window showing some likely screen modes. You can select any number of modes from this list using the SELECT and ADJUST mouse buttons in the normal way.
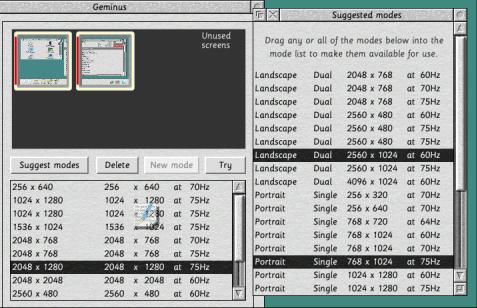
To add any of these modes into your configuration, simply drag them into the mode list in the main window. If you then select a mode in this list by clicking on it, you will see a graphical representation of this mode in the top half of the pane. This picture shows you the position and resolution of the monitors that the mode uses, and the portion of your desktop that will appear on each of the monitors. The red line on each monitor indicates its bottom edge.
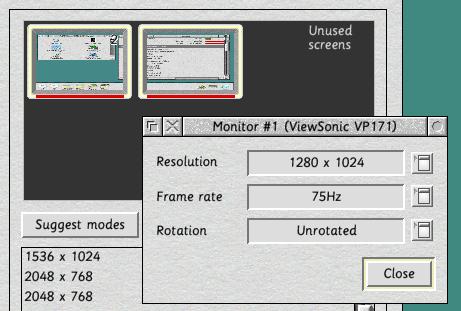
By double-clicking on any monitor in this picture you can change its resolution, rotation and frame rate using the pop-up menus as shown below:
To start with, we suggest creating a mode that uses all of your monitors in landscape mode and - if they are rotatable - another that uses them in portrait mode, eg. if you have two LCDs each capable of 1280 x 1024, then amongst the suggested modes you should see two modes akin to the following:
- Landscape Dual 2560 x 1024 at 75Hz
- Portrait Dual 2048 x 1280 at 75Hz
Once you have added the desired modes to the list in the Modes pane, you can try them out by selecting a mode and clicking on 'Try.'
Trying modes
If you select a mode and click on the 'Try' button, Geminus will switch the desktop into that screen mode and display a countdown timer with the message "Do you wish to stay in this new mode?" If you click 'No' or do not respond within the 8 second time limit, Geminus will automatically revert to the previous screen mode, allowing you to recover if - for some reason - the screen mode is unusable.

The most likely cause of a mode that doesn't produce a stable, usable picture, is that you have a mode definition in your MDF which the monitor cannot handle. If this is the case, you should edit or remove that definition from your MDF to avoid confusion, or - alternatively - tell Geminus to use a different MDF for that monitor.
Once you have a set of modes that you are happy with, just click on the 'Set' button and Geminus will remember the modes and settings for you.
Changing modes (Multi-monitor and portrait modes)
Geminus makes its modes available to you via an icon on the right hand side of the icon bar. A separate icon and window are provided in addition to the standard DisplayManager because Geminus is much more flexible and can be used to define many different screen modes all having the same resolution. Wherever possible Geminus will also make its modes available via the normal DisplayManager icon.
In Geminus's own window, a pictorial representation of the selected screen mode is provided, allowing you to easily identify the screen mode, including the resolution and orientation of the monitors that it uses.
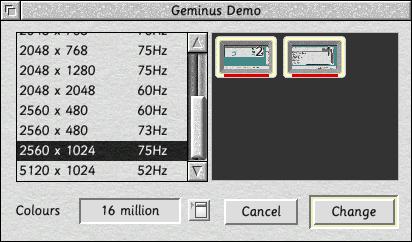
To select a screen mode, simply click SELECT on the desired mode, or use the cursor keys if the window has the input focus. Then choose the colour depth from the pop-up menu, if required, and click on the Change button.
Booting into a Geminus screen mode
If you want the machine to boot into a screen mode provided by Geminus (ie. not available via the DisplayManager) then, with the current release of Geminus, you will need to manually edit the file
!Boot.Choices.Boot.Configure.Monitor
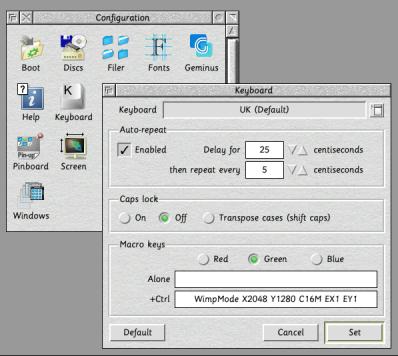
to specify the screen mode that you want to use, eg.WimpMode X2560 Y1024 C16M EX1 EY1 in place of the existing WimpMode command. Note that the EX1 EY1 suffix should be used with most modern modes/monitors to ensure that windows and text are displayed with the desired aspect ratio.
Note that you will need to install Geminus in the PreDesk directory in order to boot into a Geminus screen mode.
Applications (Acceleration feature)
The applications pane holds a list of applications that require special treatment to ensure compatibility.

Since neither RISC OS nor the application is really aware of the presence of Geminus, with some applications there can be display glitches in rare cases. If you suspect a compatibility issue with a specific application then you can add it explicitly to this list (whilst the application is running) using the "Add applications" pop up menu. Then choose which features are enabled and which disabled for that application. See here for further details.
Settings
The Settings pane of the GemConfig application allows you to alter a few of the more obscure features of Geminus; you shouldn't need to use this often.

Cacheing
To remember the contents of windows, and also sprites, Geminus creates an off-screen cache in the RAM. Since the windows on the desktop are often nearly as large as the screen, the cache must be significantly larger than the screen memory in order to move windows over each other smoothly. This configuration option allows you to choose how much of the RAM on your computer should be dedicated to the cache.
Newer RISC OS machines typically have a surplus of RAM so it makes sense to dedicate a fair amount of it to the cache for a slicker desktop experience. The default value is 12 but you may want to nudge this up to, say, 16 or even 32 if you are not using the RAM for anything else.
Note that changing this value will take effect immediately but in so doing the cache will be emptied so the next time each window is exposed it will need to be redrawn by the application before it can once again be remember in the cache.
Warning: Be cautious about increasing the scale factor too high because making the cache too large could induce failures in other software that finds itself unable to claim the memory that it needs. One example is this is the GDraw module used by AWViewer and other applications, which can fail when allocating additional memory causes the 'Wimp_ClaimFreeMemory workspace' area to be reduced to zero.
Maximum desktop size (Multi-monitor and portrait modes)
Geminus needs to be told the maximum size of your desktop screen memory so that it can allocate a range of memory addresses for the virtual screen that it creates. Note that no actual memory is used for the virtual screen now (earlier versions of Geminus did reserve memory for this purpose, limiting the amount of other software that could be used).
This is the total size of all the screens you are using when driven at their maximum resolution and colour depth; normally, with two screens, you should find the default setting of 16MB is more than adequate. If, however, you have more screens or they are capable of very high resolutions then you may want to increase this limit to 24MB.
Hot key
If you use Geminus with rotatable screen and rotate them often then you may find that your screens are in the wrong orientation when you switch on the computer. To help you change mode without using the mouse, which can be awkward, Geminus allows you to define a 'hot key' that opens its Mode changing window. You can then use the keyboard to choose a suitable mode and press Return to enter it.
DMA and AAU hardware accelerations (IYONIX pc only)
Geminus can take advantage of some specialised hardware present in the IYONIX pc, specifically the DMA channels (already implemented) and the Application Accelerator Unit (may be implemented in a later version of Geminus). The use of DMA makes scrolling and dragging between screens much faster, especially on rotated screens and it should therefore be enabled unless this is found to conflict with other new IYONIX software that takes advantage of this hardware.
Hints and Tips
If you use Geminus with rotatable LCD displays then you'll probably want to use Geminus in just two modes - native landscape and native portrait. A handy way of switching between these two modes is to define two 'coloured keys' in the Keyboard settings of Configure so that they issue the appropriate *WimpMode commands, as illustrated below:
Limitations
Oweing to the way that Geminus splits the screen display across multiple screens, the width of each screen image is constrained to a multiple of 1KB, ie. a multiple of
- 256 pixels in 16 million colour modes
- 512 pixels in 32 thousand colour modes
- 1024 pixels in 256 colour modes
In practice this constraint isn't too onerous, because in 16 million colour modes, most of the standard resolutions are available (1024 x 768, 1280 x 1024, 1536 x 1152, 2048 x 1536).
Graphics Acceleration
 Sprite plotting
Geminus contains its own sprite plotting code which uses the extra instructions and architectural features of the newer ARM processors to accelerate plotting, especially on rotated and/or colour-swapped screens.
Tinct acceleration
NetSurf and Firefox use a module called Tinct (written by Richard Wilson) to render images in their windows. When Sprite plotting is enabled for these applications Geminus will also intercept calls to the Tinct module and use DMA to accelerate the plotting of those images, leading to a smoother display in those web browsers, particularly with large images.
 Sprite cacheing
Cacheing of sprites is achieved by simply rendering the whole sprite to off-screen storage using Geminus's sprite plotting code (which is therefore also capable of the necessary rotations and colour swaps) and the visible portion of the sprite is then copied to the actual screen display using a hardware operation (or two hardware operations if the sprite must be masked). Subsequent plots of the same sprite will only perform the hardware operation requiring very little CPU involvement and PCI bus traffic.
The benefits of Geminus's sprite cacheing are especially noticable when working with large textured windows such as Filer windows or sprite files holding a lot of sprites in !Paint.
 Window cacheing
By far the slowest graphical operations that you will encounter on the RISC OS desktop are applications redrawing the contents of their windows. Sometimes this is because the application code hasn't been tuned extensively. Sometimes, as in the case of ArtWorks, it is simply because the complexity of the displayed image is essentially unbounded, so no sooner does a faster machine or more highly optimised rendering code become available than an artist creates a more photorealistic or complex image.
Geminus is able to remember the contents of windows using the off-screen memory so that when you later uncover the window by closing a window that was in front of it or by dragging another window across it, Geminus can render the uncovered area immediately using the graphics hardware rather than the much slower alternative of asking the application to redraw the unchanged contents of its window.
This makes a big difference to the fluidity of the desktop when working with large or complex vector graphics in ArtWorks. A future version of Geminus may be able to accelerate the initial rendering too, and not just subsequent redraws of the same area.
Application list
Since Geminus provides its acceleration code, and particularly the cacheing of sprites and window contents, transparently for all applications rather than as a new OS API extension, it has the potential to give problems with some applications, typically displaying images that are out of date and have not changed when the application they should.
To circumvent such problems, Geminus allows you to specify a list of applications that require special treatment, and also the ability to disable sprite plotting
 ,
sprite cacheing
  ,
redraw cacheing
  and
JPEG decoding
 for all other applications if required.
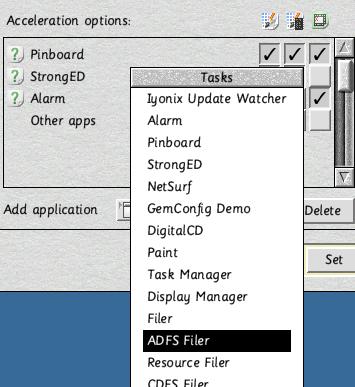
Applications can be added to the list of special cases by choosing from the pop up menu to the right of 'Add application.' This menu shows the applications that are currently running, so you must have already started the application that you wish to add to the list.
You can then alter the on/off state of each of the four accelerations as described above and click on 'Set' to apply the changes.
The 'All' and 'Clear' buttons manipulate which of the applications are selected (you can select individual applications in the normal manner by clicking with Select or Adjust over the application names). Delete will remove all selected applications from the list.
You can change the on/off state of a feature for all of the explicitly- named applications by clicking on its icon at the top of the column. Finally, any application that is running but is not explicitly named in the list will use the 'Other apps' features from the final line of the list.
Acceleration Demo
The demo version of the Geminus acceleration code allows you to quickly see the benefits of acceleration by Adjust-clicking on the Geminus iconbar icon to turn the accelerations on and off. When temporarily disabled in this way the Geminus icon will be crossed out thus:

This disables all of the following: sprite plotting, sprite cacheing, redraw cacheing, line drawing and inversions, JPEG decoding and plotting.
Faster JPEG Decoding/Plotting
Geminus can intercept JPEG-plotting calls to the SpriteExtend module from applications such as:
- PrivateEye
- Thump
- Draw
- Ovation Pro
- OpenVector
- Paint
- ChangeFSI
- SwiftJPEG
- ShowJPEG
- Pinboard (backdrop)
- ArtWorks 2
It then uses its more highly optimised JPEG decoding and plotting routines to provide rendering that is up to three times faster than the SpriteExtend routines. This can improve the usability of any image viewer such as Thump when manipulating a lot of large JPEGs.
The JPEG decoding/plotting can be disabled (or re-enabled) in the Settings pane of !GemConfig in the event that it causes problems with any of the applications that you use. If you find an application that it doesn't work with, please report the problem to us.
In addition to being faster than the SpriteExtend code, it is designed to allow music playback to continue whilst decoding and rendering large JPEGs (the SpriteExtend code executes in SVC mode and thus blocks ShareFS network traffic and audio playback from disc/network whilst it is rendering). By running in USR mode it also limits the effect of any coding errors. Note that for technical reasons if Geminus's decoder does fail it will disable itself until the next mode change, and that you can reactivate it simply by pressing F12 and then Return.
NOTE: Geminus does not currently support 'progressive encoding' which is sometimes used by websites to provide an improved experience by displaying a coarse approximation of the image sooner when the network latency is high and/or the bandwidth is low. If asked to decode/render such a JPEG, Geminus will step aside and leave the OS (SpriteExtend) to do the work but this does mean that the performance will be lower and that they cannot be transformed.
Rotated and transformed JPEGs
The JPEG code in the OS's SpriteExtend module provides SWIs to perform rotated and transformed plotting of JPEGs, but this functionality was never implemented. Geminus implements those SWIs and provides, for the first time, full rotation and skewing of JPEGs in applications such as !Draw, illustrated below:
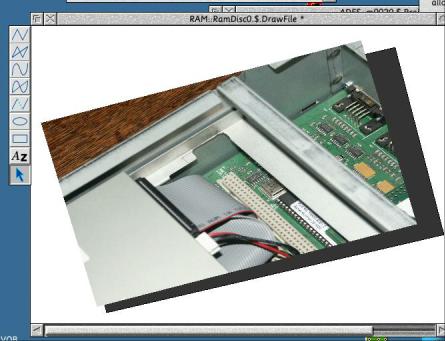
Some more advanced applications such as Ovation Pro and ArtWorks 2 are already able to rotate/skew JPEGs in this way by working around the incomplete API of the SpriteExtend module, however doing so is both slower and uses more memory.
Note: Some applications, including !Draw, will check for the ability to transform/rotate JPEGs only once when they start up or first render a JPEG, so you will need to make sure that Geminus is running with its JPEG feature enabled before starting them. OpenVector, which has recently been adapted to exploit this capability of Geminus, can adapt dynamically.
With !Draw you will see a message akin to the following if the feature is unavailable:
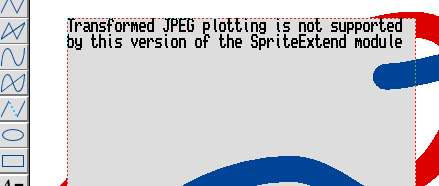
Lastly, although Geminus will render JPEGs in modes with 256 colours or fewer, it employs only a simple algorithm and does not (yet) implement dithering or error diffusion. 16bpp and 32bpp modes are considered to be much more useful nowadays and have received correspondingly more development effort. Geminus will therefore step aside and let the OS render the image if transformation is not being requested, hence there will be no speed increase in these low-colour modes for applications that just employ scaling.
ChangeFSI
Loading of large EXIF JPEGs into ChangeFSI is difficult to accelerate because the way that it works is inherently inefficient. It invokes an open source utility called 'djpeg' which converts the JPEG to a large bitmap file and saves it to disc. ChangeFSI then loads this bitmap into memory (rather slowly) before rendering.
Geminus can only hope to accelerate the JPEG decoding, via a modified djpeg utility which will be made available, but this is not the slowest stage of the above process so the speed up will not be as great as with the JPEG viewers such as !Thump and !SwiftJPEG. ChangeFSI, however, is intended for processing images rather than merely viewing them.
Possible Future Developments
A number of additional features are planned for release in later versions of Geminus, all of which have already been proven as prototype code but need completing and fully testing before they can be released.
Low-colour modes and arbitrary screen resolutions
Because the nVIDIA graphics card supplied with the IYONIX pc does not support screens with fewer than 256 colours, these screen modes have to be emulated. This is only an issue for older, 26-bit software and this feature is therefore currently included in Aemulor Pro. Moving this emulation into Geminus, by combining it with the emulation required to support rotated screens, provides a considerable performance increase and it is therefore anticipated that a later version of Geminus will replace Aemulor Pro's screen emulation.
At the same time, support would be added for image scaling so that any screen mode may be supported, sidestepping the constraints of the physical dispaly.
Display adapter support
Support for adapter hardware such as the USB monitor drivers from DisplayLink would allow additional monitors to provide a larger desktop even for those machines that do not support plug-in expansion cards.
-
VNC server
Geminus allows your RISC OS box to have a larger desktop area. If another machine on the same network is running a VNC client in full screen mode, Geminus could serve part of your RISC OS desktop to that machine, allowing you to use its monitor too.
Troubleshooting
- Geminus can't be killed at the moment (Another program is using
the SWI vector)
This error may be displayed when trying to stop Geminus using *RMKill or when trying to reload Geminus. In order to stop Geminus completely you will need to identify and stop the other program, which will typically be SpecialFX or Aemulor. Once you have stopped the conflicting program, you can proceed to *RMKill Geminus or to restart it.
The conflict arises from a limitation of the RISC OS kernel, and the conflicting program will have been loaded after Geminus was loaded.
- Geminus can't be killed at the moment (Another program is using
the SWI vector)
You can find more information about Geminus on the website or contact the support email address 'support@sendiri.co.uk'
Geminus is Copyright © Adrian Lees 2004-2022.